Pagina Test: differenze tra le versioni
| (52 versioni intermedie di 3 utenti non mostrate) | |||
| Riga 1: | Riga 1: | ||
[[FILE:Guild_battlegrounds_backgroundmap_rd6.png|left|600px|link=]] <br> __TOC__<br> | |||
<br><br><br> | |||
=== History === | |||
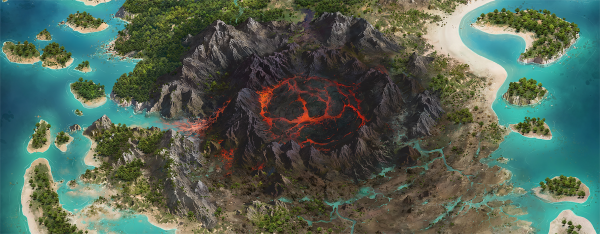
The Volcano is the first [[Guild_Battlegrounds|Guild Battleground]] map. It went live when Guild battlegrounds were first launched in November 2019 and the setting is an amazing fire and rock Volcano surrounded by water. | |||
<br><br><br> | |||
=== Map layout === | |||
= | [[File:MapLayoutVolcano.png|left|300px|link=]] | ||
The Volcano map is like an actual volcano dynamic with at big variation in size and number of adjacent provinces.This variation creates the need for tactical thinking when fighting on the map. | |||
<br><br><br><br><br><br><br><br><br><br> | |||
===Rewards === | |||
You can obtain immediate, temporary and permanent rewards in the Battlegrounds. There's a chance to obtain Forge Points, units, attackers boosts, goods, diamonds and fragments for the Statue of Honor after each fight or negotiation. The magnitude of these rewards depends on your league! Your guild should gain temporary prestige points according to its current league, but keep in mind that you can also lose them likewise when dropping in the league. Lastly, we also have permanent rewards for you and your guild: Guilds can get guild power according to their placement within a battleground (the amount also scales according to the league), and simultaneously you can get fragments for the Statue of Honor Selection Kit. | |||
==Guild Rewards== | |||
When a battleground ends, guilds may obtain various rewards which depend on placement: | |||
* Prestige according to current league and placement; | |||
* Guild Power according to placement within a battleground | |||
* Fragments of the Statue of Honor and for those participating in the Platinum/Diamond Leagues also fragments of Road to victory | |||
[[FILE:Guild_Battlegrounds_2021.png|left|500px|link=]] <br> __TOC__<br> | |||
<br><br><br><br> | |||
=== History === | |||
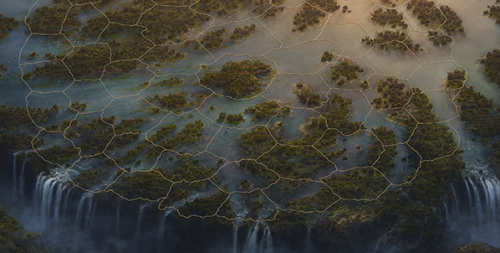
The Waterfall Archipelago is the second [[Guild_Battlegrounds|Guild Battleground]] map. It went live in December 2021 and the setting is a really stunning Archipelago of small islands on top of a great waterfall instead of the fire and rock settings of the first battleground. | |||
=== Map layout === | |||
[[FILE:Spawn points.png|left|200px|link=]] | |||
The size of the Map is basically the same as before but the Sectors are in hexagonal shape which increases the difficulty level since there are now up to six attack paths to some of them. | |||
<br><br><br><br><br><br><br><br><br><br> | |||
===Rewards === | |||
You can obtain immediate, temporary and permanent rewards in the Battlegrounds. There's a chance to obtain Forge Points, units, attackers boosts, goods, diamonds and fragments for The Great Elephant after each fight or negotiation. The magnitude of these rewards depends on your league! Your guild should gain temporary prestige points according to its current league, but keep in mind that you can also lose them likewise when dropping in the league. Lastly, we also have permanent rewards for you and your guild: Guilds can get guild power according to their placement within a battleground (the amount also scales according to the league), and simultaneously you can get fragments for The Great Elephant Selection Kit. | |||
= | [[FILE:GBGRewards6.png|center|link=]] | ||
==== | === Guild Rewards=== | ||
{| | |||
! style="text-align: center;" Rowspan="2" | {{sized-external-image|25px|https://foeit.innogamescdn.com/assets/shared/icons/rank.png}} Rank | |||
! style="text-align: center;" Colspan="2" | {{sized-external-image|25px|https://foeit.innogamescdn.com/assets/guild_battlegrounds/hud/guild_battlegrounds_league_copper.png}} Copper | |||
! style="text-align: center;" Colspan="2" | {{sized-external-image|25px|https://foeit.innogamescdn.com/assets/guild_battlegrounds/hud/guild_battlegrounds_league_silver.png}} Silver | |||
! style="text-align: center;" Colspan="2" | {{sized-external-image|25px|https://foeit.innogamescdn.com/assets/guild_battlegrounds/hud/guild_battlegrounds_league_gold.png}} Gold | |||
|- | |||
! style="text-align: center;" | {{sized-external-image|25px|https://foeit.innogamescdn.com/assets/shared/icons/icon_fragment.png}} Fragments of TGE | |||
! style="text-align: center;" | {{sized-external-image|25px|https://foeit.innogamescdn.com/assets/shared/icons/clan_power.png}} Power | |||
! style="text-align: center;" | {{sized-external-image|25px|https://foeit.innogamescdn.com/assets/shared/icons/icon_fragment.png}} Fragments of TGE | |||
! style="text-align: center;" | {{sized-external-image|25px|https://foeit.innogamescdn.com/assets/shared/icons/clan_power.png}} Power | |||
! style="text-align: center;" | {{sized-external-image|25px|https://foeit.innogamescdn.com/assets/shared/icons/icon_fragment.png}} Fragments of TGE | |||
! style="text-align: center;" | {{sized-external-image|25px|https://foeit.innogamescdn.com/assets/shared/icons/clan_power.png}} Power | |||
|- | |||
| style="text-align: left;" | 1 {{sized-external-image|25px|https://foeit.innogamescdn.com/assets/shared/icons/reward_icons/reward_icon_guild_battlegrounds_chest_1.png}} | |||
| style="text-align: right;" | 13 | |||
| style="text-align: right;" | 54600 | |||
| style="text-align: right;" | 26 | |||
| style="text-align: right;" | 109200 | |||
| style="text-align: right;" | 39 | |||
| style="text-align: right;" | 163800 | |||
|- | |||
| style="text-align: left;" | 2 {{sized-external-image|25px|https://foeit.innogamescdn.com/assets/shared/icons/reward_icons/reward_icon_guild_battlegrounds_chest_2.png}} | |||
| style="text-align: right;" | 12 | |||
| style="text-align: right;" | 47900 | |||
| style="text-align: right;" | 23 | |||
| style="text-align: right;" | 95700 | |||
| style="text-align: right;" | 35 | |||
| style="text-align: right;" | 143500 | |||
|- | |||
| style="text-align: left;" | 3 {{sized-external-image|25px|https://foeit.innogamescdn.com/assets/shared/icons/reward_icons/reward_icon_guild_battlegrounds_chest_3.png}} | |||
| style="text-align: right;" | 11 | |||
| style="text-align: right;" | 43,300 | |||
| style="text-align: right;" | 21 | |||
| style="text-align: right;" | 86500 | |||
| style="text-align: right;" | 31 | |||
| style="text-align: right;" | 129700 | |||
|- | |||
| style="text-align: left;" | 4 {{sized-external-image|25px|https://foeit.innogamescdn.com/assets/shared/icons/reward_icons/reward_icon_guild_battlegrounds_chest_4.png}} | |||
| style="text-align: right;" | 10 | |||
| style="text-align: right;" | 40,800 | |||
| style="text-align: right;" | 20 | |||
| style="text-align: right;" | 81500 | |||
| style="text-align: right;" | 30 | |||
| style="text-align: right;" | 122300 | |||
|- | |||
| style="text-align: left;" | 5 {{sized-external-image|25px|https://foeit.innogamescdn.com/assets/shared/icons/reward_icons/reward_icon_guild_battlegrounds_chest_5.png}} | |||
| style="text-align: right;" | 10 | |||
| style="text-align: right;" | 40,400 | |||
| style="text-align: right;" | 20 | |||
| style="text-align: right;" | 80700 | |||
| style="text-align: right;" | 29 | |||
| style="text-align: right;" | 121000 | |||
|- | |||
| style="text-align: left;" | 6 {{sized-external-image|25px|https://foeit.innogamescdn.com/assets/shared/icons/reward_icons/reward_icon_guild_battlegrounds_chest_6.png}} | |||
| style="text-align: right;" | 10 | |||
| style="text-align: right;" | 39,900 | |||
| style="text-align: right;" | 19 | |||
| style="text-align: right;" | 79800 | |||
| style="text-align: right;" | 29 | |||
| style="text-align: right;" | 119700 | |||
|- | |||
| style="text-align: left;" | 7 {{sized-external-image|25px|https://foeit.innogamescdn.com/assets/shared/icons/reward_icons/reward_icon_guild_battlegrounds_chest_7.png}} | |||
| style="text-align: right;" | 10 | |||
| style="text-align: right;" | 39,500 | |||
| style="text-align: right;" | 19 | |||
| style="text-align: right;" | 79000 | |||
| style="text-align: right;" |29 | |||
| style="text-align: right;" | 118500 | |||
|- | |||
| style="text-align: left;" | 8 {{sized-external-image|25px|https://foeit.innogamescdn.com/assets/shared/icons/reward_icons/reward_icon_guild_battlegrounds_chest_8.png}} | |||
| style="text-align: right;" | 10 | |||
| style="text-align: right;" | 39,100 | |||
| style="text-align: right;" | 19 | |||
| style="text-align: right;" | 78200 | |||
| style="text-align: right;" | 28 | |||
| style="text-align: right;" | 117200 | |||
|} | |||
=== | {| | ||
! style="text-align: center;" Rowspan="2" | {{sized-external-image|25px|https://foeit.innogamescdn.com/assets/shared/icons/rank.png}} Rank | |||
! style="text-align: center;" Colspan="3" | {{sized-external-image|25px|https://foeit.innogamescdn.com/assets/guild_battlegrounds/hud/guild_battlegrounds_league_platinum.png}} Platinum | |||
! style="text-align: center;" Colspan="3" | {{sized-external-image|25px|https://foeit.innogamescdn.com/assets/guild_battlegrounds/hud/guild_battlegrounds_league_diamond.png}} Diamond | |||
|- | |||
! style="text-align: center;" | {{sized-external-image|25px|https://foeit.innogamescdn.com/assets/shared/icons/icon_fragment.png}} Fragments of TGE | |||
! style="text-align: center;" | {{sized-external-image|25px|https://foeit.innogamescdn.com/assets/shared/icons/icon_fragment.png}} Fragments of IG | |||
! style="text-align: center;" | {{sized-external-image|25px|https://foeit.innogamescdn.com/assets/shared/icons/clan_power.png}} Power | |||
|- | |||
| style="text-align: left;" | 1 {{sized-external-image|25px|https://foeit.innogamescdn.com/assets/shared/icons/reward_icons/reward_icon_guild_battlegrounds_chest_1.png}} | |||
| style="text-align: right;" | 52 | |||
| style="text-align: right;" | 48 | |||
| style="text-align: right;" | 218400 | |||
| style="text-align: right;" | 78 | |||
| style="text-align: right;" | 72 | |||
| style="text-align: right;" | 327600 | |||
|- | |||
| style="text-align: left;" | 2 {{sized-external-image|25px|https://foeit.innogamescdn.com/assets/shared/icons/reward_icons/reward_icon_guild_battlegrounds_chest_2.png}} | |||
| style="text-align: right;" | 46 | |||
| style="text-align: right;" | 40 | |||
| style="text-align: right;" | 191300 | |||
| style="text-align: right;" | 62 | |||
| style="text-align: right;" | 52 | |||
| style="text-align: right;" | 287000 | |||
|- | |||
| style="text-align: left;" | 3 {{sized-external-image|25px|https://foeit.innogamescdn.com/assets/shared/icons/reward_icons/reward_icon_guild_battlegrounds_chest_3.png}} | |||
| style="text-align: right;" | 42 | |||
| style="text-align: right;" | 35 | |||
| style="text-align: right;" | 172900 | |||
| style="text-align: right;" | 62 | |||
| style="text-align: right;" | 52 | |||
| style="text-align: right;" | 259400 | |||
|- | |||
| style="text-align: left;" | 4 {{sized-external-image|25px|https://foeit.innogamescdn.com/assets/shared/icons/reward_icons/reward_icon_guild_battlegrounds_chest_4.png}} | |||
| style="text-align: right;" | 39 | |||
| style="text-align: right;" | 31 | |||
| style="text-align: right;" | 163000 | |||
| style="text-align: right;" | 59 | |||
| style="text-align: right;" | 46 | |||
| style="text-align: right;" | 244500 | |||
|- | |||
| style="text-align: left;" | 5 {{sized-external-image|25px|https://foeit.innogamescdn.com/assets/shared/icons/reward_icons/reward_icon_guild_battlegrounds_chest_5.png}} | |||
| style="text-align: right;" | 39 | |||
| style="text-align: right;" | 29 | |||
| style="text-align: right;" | 161300 | |||
| style="text-align: right;" | 58 | |||
| style="text-align: right;" | 43 | |||
| style="text-align: right;" | 242000 | |||
|- | |||
| style="text-align: left;" | 6 {{sized-external-image|25px|https://foeit.innogamescdn.com/assets/shared/icons/reward_icons/reward_icon_guild_battlegrounds_chest_6.png}} | |||
| style="text-align: right;" | 38 | |||
| style="text-align: right;" | 27 | |||
| style="text-align: right;" | 159600 | |||
| style="text-align: right;" | 57 | |||
| style="text-align: right;" | 40 | |||
| style="text-align: right;" | 239400 | |||
|- | |||
| style="text-align: left;" | 7 {{sized-external-image|25px|https://foeit.innogamescdn.com/assets/shared/icons/reward_icons/reward_icon_guild_battlegrounds_chest_7.png}} | |||
| style="text-align: right;" | 38 | |||
| style="text-align: right;" | 24 | |||
| style="text-align: right;" | 158000 | |||
| style="text-align: right;" | 57 | |||
| style="text-align: right;" | 37 | |||
| style="text-align: right;" | 236900 | |||
|- | |||
| style="text-align: left;" | 8 {{sized-external-image|25px|https://foeit.innogamescdn.com/assets/shared/icons/reward_icons/reward_icon_guild_battlegrounds_chest_8.png}} | |||
| style="text-align: right;" | 38 | |||
| style="text-align: right;" | 23 | |||
| style="text-align: right;" | 156300 | |||
| style="text-align: right;" | 56 | |||
| style="text-align: right;" | 34 | |||
| style="text-align: right;" | 234400 | |||
|} | |||
==== The Great Elephant ==== | |||
The Great Elephant is a 4x3 building, upgradeable up to 8 levels. As you upgrade it, you will receive different bonuses including: a coin production bonus, forge points, as well as goods to the Guild treasury and an increase in Guild Power! Lastly, and most importantly, there is also an attacking bonus for your attacking armies! | |||
On its eighth and final level, you will met with a choice. A choice which reflects the variety of roles the elephant has held throughout the ages. Will you choose to employ your Great Elephant in battle, trade, or support? With these three brancheable choices; the decision is very much in your hands! | |||
'''Note:''' 50% of the time, the immediate reward will be one fragment for the The Great Elephant Selection kit. | |||
{| | |||
! style="text-align: center; width: 20%;" | [[The Great Elephant - Lv. 1]] | |||
! style="text-align: center; width: 20%;" | [[The Great Elephant - Lv. 2]] | |||
! style="text-align: center; width: 20%;" | [[The Great Elephant - Lv. 3]] | |||
! style="text-align: center; width: 20%;" | [[The Great Elephant - Lv. 4]] | |||
|- | |||
| {{sized-external-image|175px|https://foeit.innogamescdn.com/assets/city/buildings/R_SS_MultiAge_Battlegrounds3a-586f50f92.png}} | |||
| {{sized-external-image|175px|https://foeit.innogamescdn.com/assets/city/buildings/R_SS_MultiAge_Battlegrounds3b-7a829efbc.png}} | |||
| {{sized-external-image|175px|https://foeit.innogamescdn.com/assets/city/buildings/R_SS_MultiAge_Battlegrounds3c-e287d1a8d.png}} | |||
| {{sized-external-image|175px|https://foeit.innogamescdn.com/assets/city/buildings/R_SS_MultiAge_Battlegrounds3d-567f03961.png}} | |||
|} | |||
{| | |||
! style="text-align: center; width: 20%;" | [[The Great Elephant - Lv. 5]] | |||
! style="text-align: center; width: 20%;" | [[The Great Elephant - Lv. 6]] | |||
! style="text-align: center; width: 20%;" | [[The Great Elephant - Lv. 7]] | |||
|- | |||
| {{sized-external-image|175px|https://foeit.innogamescdn.com/assets/city/buildings/R_SS_MultiAge_Battlegrounds3e-b6eb4cbc1.png}} | |||
| {{sized-external-image|175px|https://foeit.innogamescdn.com/assets/city/buildings/R_SS_MultiAge_Battlegrounds3f-d01d0b7b2.png}} | |||
| {{sized-external-image|175px|https://foeit.innogamescdn.com/assets/city/buildings/R_SS_MultiAge_Battlegrounds3g-dc26791b7.png}} | |||
|} | |||
{| | |||
! style="text-align: center; width: 20%;" | [[The Elephant's Bazaar]] | |||
! style="text-align: center; width: 20%;" | [[The Elephant's Citadel]] | |||
! style="text-align: center; width: 20%;" | [[The Elephant's Royalty]] | |||
|- | |||
| {{sized-external-image|175px|https://foeit.innogamescdn.com/assets/city/buildings/R_SS_MultiAge_Battlegrounds3hBazaar-ce1975527.png}} | |||
| {{sized-external-image|175px|https://foeit.innogamescdn.com/assets/city/buildings/R_SS_MultiAge_Battlegrounds3f-d01d0b7b2.png}} | |||
| {{sized-external-image|175px|https://foeit.innogamescdn.com/assets/city/buildings/R_SS_MultiAge_Battlegrounds3g-dc26791b7.png}} | |||
|} | |||
==== Iridescent Garden ==== | |||
Chain Building Addition - Iridescent Garden | |||
Yet, that is not all you can win from a successful campaign! Indeed, diamonds and platinum league Guild participants can also win fragments of the Iridescent garden. With enough fragments, you can construct one of three possible appearances for the building, and bolster the stats of your Great Elephant! | |||
{| | |||
! style="text-align: center;" Colspan="3" |[[Iridescent Garden]] | |||
[[ | |||
|- | |- | ||
! style="text-align: center;" |[[File:D SS MultiAge Battlegrounds4.png]] | |||
! style="text-align:center; | ! style="text-align: center;" |[[File:D SS MultiAge Battlegrounds4b.png]] | ||
! style="text-align:center; | ! style="text-align: center;" |[[File:D SS MultiAge Battlegrounds4c.png]] | ||
|- | |- | ||
! style="text-align: center;" Colspan="3" | Once connected it provides Happiness Bonus,Defensive boost for the attacker,3 Goods,1 Forge Point | |||
Bonus | |||
|- | |- | ||
| | |} | ||
Important tips - As this is a chain building, it will need to be connected to the Great Elephant to receive certain bonuses. | |||
==== Personal Rewards ==== | |||
Besides fragments to great elephant selection kits, you will find Diamonds, Forge Points, Goods, Units,coins, Supplies, attacker boost among the personal rewards in this battleground | |||
===Individual Rewards=== | |||
Apart from rewards for your guild, there are also individual rewards, whenever you contribute by fighting or negotiating, there is a chance to win some [[Forge Points]], [[Goods]], a [[Units List|military unit]], attacker boost or even [[Diamonds]]. | |||
Versione attuale delle 00:16, 6 dic 2021
History
The Volcano is the first Guild Battleground map. It went live when Guild battlegrounds were first launched in November 2019 and the setting is an amazing fire and rock Volcano surrounded by water.
Map layout
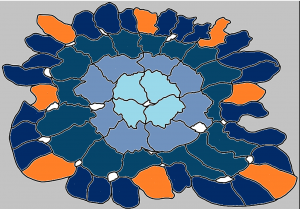
The Volcano map is like an actual volcano dynamic with at big variation in size and number of adjacent provinces.This variation creates the need for tactical thinking when fighting on the map.
Rewards
You can obtain immediate, temporary and permanent rewards in the Battlegrounds. There's a chance to obtain Forge Points, units, attackers boosts, goods, diamonds and fragments for the Statue of Honor after each fight or negotiation. The magnitude of these rewards depends on your league! Your guild should gain temporary prestige points according to its current league, but keep in mind that you can also lose them likewise when dropping in the league. Lastly, we also have permanent rewards for you and your guild: Guilds can get guild power according to their placement within a battleground (the amount also scales according to the league), and simultaneously you can get fragments for the Statue of Honor Selection Kit.
Guild Rewards
When a battleground ends, guilds may obtain various rewards which depend on placement:
- Prestige according to current league and placement;
- Guild Power according to placement within a battleground
- Fragments of the Statue of Honor and for those participating in the Platinum/Diamond Leagues also fragments of Road to victory
History
The Waterfall Archipelago is the second Guild Battleground map. It went live in December 2021 and the setting is a really stunning Archipelago of small islands on top of a great waterfall instead of the fire and rock settings of the first battleground.
Map layout
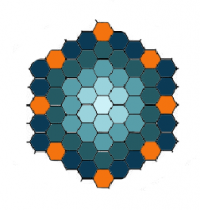
The size of the Map is basically the same as before but the Sectors are in hexagonal shape which increases the difficulty level since there are now up to six attack paths to some of them.
Rewards
You can obtain immediate, temporary and permanent rewards in the Battlegrounds. There's a chance to obtain Forge Points, units, attackers boosts, goods, diamonds and fragments for The Great Elephant after each fight or negotiation. The magnitude of these rewards depends on your league! Your guild should gain temporary prestige points according to its current league, but keep in mind that you can also lose them likewise when dropping in the league. Lastly, we also have permanent rewards for you and your guild: Guilds can get guild power according to their placement within a battleground (the amount also scales according to the league), and simultaneously you can get fragments for The Great Elephant Selection Kit.

Guild Rewards
 |
 |
 | ||||
|---|---|---|---|---|---|---|
| 1 |
13 | 54600 | 26 | 109200 | 39 | 163800 |
| 2 |
12 | 47900 | 23 | 95700 | 35 | 143500 |
| 3 |
11 | 43,300 | 21 | 86500 | 31 | 129700 |
| 4 |
10 | 40,800 | 20 | 81500 | 30 | 122300 |
| 5 |
10 | 40,400 | 20 | 80700 | 29 | 121000 |
| 6 |
10 | 39,900 | 19 | 79800 | 29 | 119700 |
| 7 |
10 | 39,500 | 19 | 79000 | 29 | 118500 |
| 8 |
10 | 39,100 | 19 | 78200 | 28 | 117200 |
 |
 | |||||
|---|---|---|---|---|---|---|
| 1 |
52 | 48 | 218400 | 78 | 72 | 327600 |
| 2 |
46 | 40 | 191300 | 62 | 52 | 287000 |
| 3 |
42 | 35 | 172900 | 62 | 52 | 259400 |
| 4 |
39 | 31 | 163000 | 59 | 46 | 244500 |
| 5 |
39 | 29 | 161300 | 58 | 43 | 242000 |
| 6 |
38 | 27 | 159600 | 57 | 40 | 239400 |
| 7 |
38 | 24 | 158000 | 57 | 37 | 236900 |
| 8 |
38 | 23 | 156300 | 56 | 34 | 234400 |
The Great Elephant
The Great Elephant is a 4x3 building, upgradeable up to 8 levels. As you upgrade it, you will receive different bonuses including: a coin production bonus, forge points, as well as goods to the Guild treasury and an increase in Guild Power! Lastly, and most importantly, there is also an attacking bonus for your attacking armies!
On its eighth and final level, you will met with a choice. A choice which reflects the variety of roles the elephant has held throughout the ages. Will you choose to employ your Great Elephant in battle, trade, or support? With these three brancheable choices; the decision is very much in your hands!
Note: 50% of the time, the immediate reward will be one fragment for the The Great Elephant Selection kit.
| The Great Elephant - Lv. 1 | The Great Elephant - Lv. 2 | The Great Elephant - Lv. 3 | The Great Elephant - Lv. 4 |
|---|---|---|---|
 |
 |
 |
 |
| The Great Elephant - Lv. 5 | The Great Elephant - Lv. 6 | The Great Elephant - Lv. 7 |
|---|---|---|
 |
 |
 |
| The Elephant's Bazaar | The Elephant's Citadel | The Elephant's Royalty |
|---|---|---|
 |
|
|
Iridescent Garden
Chain Building Addition - Iridescent Garden
Yet, that is not all you can win from a successful campaign! Indeed, diamonds and platinum league Guild participants can also win fragments of the Iridescent garden. With enough fragments, you can construct one of three possible appearances for the building, and bolster the stats of your Great Elephant!
| Iridescent Garden | ||
|---|---|---|

|

|

|
| Once connected it provides Happiness Bonus,Defensive boost for the attacker,3 Goods,1 Forge Point | ||
Important tips - As this is a chain building, it will need to be connected to the Great Elephant to receive certain bonuses.
Personal Rewards
Besides fragments to great elephant selection kits, you will find Diamonds, Forge Points, Goods, Units,coins, Supplies, attacker boost among the personal rewards in this battleground
Individual Rewards
Apart from rewards for your guild, there are also individual rewards, whenever you contribute by fighting or negotiating, there is a chance to win some Forge Points, Goods, a military unit, attacker boost or even Diamonds.