|
|
| Riga 1: |
Riga 1: |
| [[File:GBG_2021_Banner.png|500px|link=|left]] <br> __TOC__<br>
| |
|
| |
|
| ==What is the Guild Battlegrounds?== | | [[FILE:Guild_battlegrounds_backgroundmap_rd6.png|left|600px|link=]] <br> __TOC__<br> |
| | <br><br><br> |
| | === History === |
|
| |
|
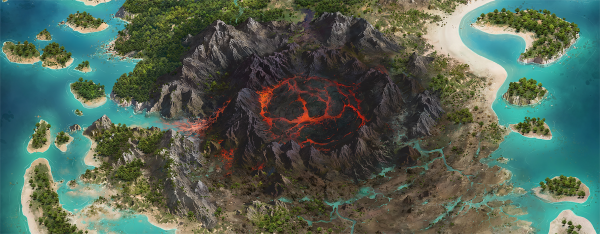
| Guild battlegrounds is a feature which allows guilds to match their skills in battle, strategy and power against other guilds on a battleground map. There are diiterent battleground maps with diiterent challenges and rewards on which the participating guilds can challenge each other and gain both personal and guild rewards as well as guild power points. | | The Volcano is the first [[Guild_Battlegrounds|Guild Battleground]] map. It went live when Guild battlegrounds were first launched in November 2019 and the setting is an amazing fire and rock Volcano surrounded by water. |
| | <br><br><br> |
|
| |
|
| Guilds are matched by leagues, and the guilds fight for provinces on one of the battleground maps. Each province will provide a certain amount of victory points to the owner guild every hour. The amount of victory points decides the final ranking in the battleground and depending on your guild’s performance, it may move up or down in the league system. Moving up means that the Battlegrounds will get even more challenging, as your guild will face more competitive rivals as it grows but will also provide even better rewards for both the guild members and the guild.
| | === Map layout === |
|
| |
|
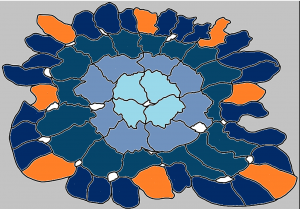
| == Maps == | | [[File:MapLayoutVolcano.png|left|300px|link=]] |
| | The Volcano map is like an actual volcano dynamic with at big variation in size and number of adjacent provinces.This variation creates the need for tactical thinking when fighting on the map. |
| | <br><br><br><br><br><br><br><br><br><br> |
|
| |
|
| {|
| | ===Rewards === |
| ! style="text-align: center; width: 50%;" |'''The Volcano'''
| | You can obtain immediate, temporary and permanent rewards in the Battlegrounds. There's a chance to obtain Forge Points, units, attackers boosts, goods, diamonds and fragments for the Statue of Honor after each fight or negotiation. The magnitude of these rewards depends on your league! Your guild should gain temporary prestige points according to its current league, but keep in mind that you can also lose them likewise when dropping in the league. Lastly, we also have permanent rewards for you and your guild: Guilds can get guild power according to their placement within a battleground (the amount also scales according to the league), and simultaneously you can get fragments for the Statue of Honor Selection Kit. |
| ! style="text-align: center; width: 50%;" |'''The Waterfall Archipelago'''
| |
| |-
| |
| | style="text-align: center;" |[[FILE:Guild_battlegrounds_backgroundmap_rd6.png|center|450px|link=The Volcano]]
| |
| | style="text-align: center;" |[[FILE:Guild_Battlegrounds_2021.png|center|400px|link=The Archipelago]]
| |
| |}
| |
| | |
| Starting December 2021, the maps began to alternate (meaning once you have played one map, that the next will follow). In addition, to being alternating, the map will also be the same for the entire world. Therefore, everyone on a server will experience the same map at the same time! Click on a Guild Battleground map to learn more about the particular battleground!
| |
|
| |
|
| ==How do I access the Guild Battlegrounds?== | | ==Guild Rewards== |
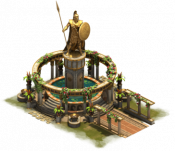
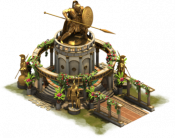
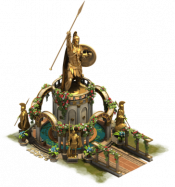
| Much like other Forge of Empires features, the access to Guild Battlegrounds will appear in your city. As soon as you are a guild member and you unlock the technology [[Iron|Military Tactics]] in the tech tree, you will gain access to this feature. Once unlocked you will see on the outskirts of your city, just next to your [[Cultural Settlements]] access point, you'll see a new structure.
| | When a battleground ends, guilds may obtain various rewards which depend on placement: |
| | * Prestige according to current league and placement; |
| | * Guild Power according to placement within a battleground |
| | * Fragments of the Statue of Honor and for those participating in the Platinum/Diamond Leagues also fragments of Road to victory |
|
| |
|
| | ===Guild Reward Table=== |
| {| | | {| |
| ! style="text-align: center; width: 50%;" |'''Before unlocking''' | | ! style="text-align: center;" Rowspan="2" | {{sized-external-image|25px|https://foeit.innogamescdn.com/assets/shared/icons/rank.png}} Rank |
| ! style="text-align: center; width: 50%;" |'''After unlocking''' | | ! style="text-align: center;" Colspan="3" | {{sized-external-image|25px|https://foeit.innogamescdn.com/assets/guild_battlegrounds/hud/guild_battlegrounds_league_platinum.png}} Platinum |
| | ! style="text-align: center;" Colspan="3" | {{sized-external-image|25px|https://foeit.innogamescdn.com/assets/guild_battlegrounds/hud/guild_battlegrounds_league_diamond.png}} Diamond |
| | |- |
| | ! style="text-align: center;" | {{sized-external-image|25px|https://foeit.innogamescdn.com/assets/shared/icons/icon_fragment.png}} Fragments of SoH |
| | ! style="text-align: center;" | {{sized-external-image|25px|https://foeit.innogamescdn.com/assets/shared/icons/icon_fragment.png}} Fragments of RtV |
| | ! style="text-align: center;" | {{sized-external-image|25px|https://foeit.innogamescdn.com/assets/shared/icons/clan_power.png}} Power |
| | |- |
| | | style="text-align: left;" | 1 {{sized-external-image|25px|https://foeit.innogamescdn.com/assets/shared/icons/reward_icons/reward_icon_guild_battlegrounds_chest_1.png}} |
| | | style="text-align: right;" | 91 |
| | | style="text-align: right;" | 91 |
| | | style="text-align: right;" | 382.200 |
| | | style="text-align: right;" | 120 |
| | | style="text-align: right;" | 130 |
| | | style="text-align: right;" | 546.000 |
| | |- |
| | | style="text-align: left;" | 2 {{sized-external-image|25px|https://foeit.innogamescdn.com/assets/shared/icons/reward_icons/reward_icon_guild_battlegrounds_chest_2.png}} |
| | | style="text-align: right;" | 80 |
| | | style="text-align: right;" | 80 |
| | | style="text-align: right;" | 334,800 |
| | | style="text-align: right;" | 114 |
| | | style="text-align: right;" | 110 |
| | | style="text-align: right;" | 478,200 |
| |- | | |- |
| | style="text-align: center;" | {{sized-external-image|400px|https://foezz.innogamescdn.com/assets/city/buildings/V_SS_StoneAge_BattlegroundRuins.png}} | | | style="text-align: left;" | 3 {{sized-external-image|25px|https://foeit.innogamescdn.com/assets/shared/icons/reward_icons/reward_icon_guild_battlegrounds_chest_3.png}} |
| | style="text-align: center;" | {{sized-external-image|400px|https://foezz.innogamescdn.com/assets/city/buildings/V_SS_IronAge_BattlegroundCopper.png}} | | | style="text-align: right;" | 73 |
| |} | | | style="text-align: right;" | 73 |
| | | | style="text-align: right;" | 302,600 |
| Click on the Guild Battleground building to open the exciting new PvP feature!
| | | style="text-align: right;" | 103 |
| | | | style="text-align: right;" | 103 |
| ==How can I participate in a Battleground?==
| | | style="text-align: right;" | 432,200 |
| | |
| Each Battleground match will be formed by a map with 5-8 guilds that will battle each other for 11 consecutive days. Besides that, the map consists of a fixed number of provinces, where each guild will be initially placed at the edges with a province and an included HQ (the map distribution should provide as equitable distances as possible between guilds). These main provinces, in turn, can never be conquered by other guilds.
| |
| | |
| [[FILE:Startingspotgbg.png|center|900px|link=]]
| |
| | |
| Upon completion of each battleground, there will be a 3-days break for the guilds to rest, collect their rewards and make new preparations. The guild score will then be updated, and its members will see if they have increased or dropped their progress in the League System.
| |
| | |
| | |
| == The basics ==
| |
| | |
| === Provinces ===
| |
| Each Battleground consist of a number of provinces. To find a particular province is easy because the naming reflects its position on the battleground map.
| |
| | |
| [[File:Province Names.png|center|400px|link=]]
| |
| | |
| Each province is identified by a letter and a number. The letter indicates the direction and sector (i.e D is Southwest sector), and the number of the ring the province is in (i.e 1 is ring 1).To allow you to be more accurate in finding the province, we have also added a letter, to indicate the position of the province within the sector and ring.
| |
| | |
| ===Conquest Flags - Attacking & Negotiating===
| |
| Guilds can only attack provinces which are adjacent to one of their own, and as soon as a guild begins attacking an adjacent province, a “conquest flag” will be displayed in the target province. Each action of the guild with the highest progress will increase the strength of the flag, until it is at full strength and the rival province gets taken over:
| |
| | |
| [[FILE:gbgconquestflag1.png|center|link=]]
| |
| | |
| Subsequently, the conquered province will stay in a ‘lock down’ state for 4 hours, which means that no guild can progress their conquest flag further in that province. Only the flag of the guild with the most progress will be displayed in a province, but other guilds progressing on that province will be indicated by small colored shields next to the flag. Also, you can always check a detailed list of guilds as well as their progress by clicking it.
| |
| | |
| [[FILE:gbgconquestflag2.png|center|link=]]
| |
| | |
| To contribute to a certain conquest flag, any guild member can tap on that province to bring up its window. Two options for earning points will be available there: Attack and negotiation. The enemy composition for the battle option, as well as the costs for the negotiation option, will depend on the attacking player's age. At the same time, negotiation provides more than one advance as it takes more time and resources to complete.
| |
| | |
| When a certain amount of advances is reached, the province will get taken over. The amount of advances needed depends on the league - higher leagues needing more advances.
| |
| | |
| | |
| {|
| |
| ! style="text-align: center; width: 25%;" | '''League ->'''
| |
| ! style="text-align: center; width: 15%;" | {{sized-external-image|25px|https://foezz.innogamescdn.com/assets/guild_battlegrounds/hud/guild_battlegrounds_league_copper.png}} '''Copper'''
| |
| ! style="text-align: center; width: 15%;" | {{sized-external-image|25px|https://foezz.innogamescdn.com/assets/guild_battlegrounds/hud/guild_battlegrounds_league_silver.png}} '''Silver'''
| |
| ! style="text-align: center; width: 15%;" | {{sized-external-image|25px|https://foezz.innogamescdn.com/assets/guild_battlegrounds/hud/guild_battlegrounds_league_gold.png}} '''Gold'''
| |
| ! style="text-align: center; width: 15%;" | {{sized-external-image|25px|https://foezz.innogamescdn.com/assets/guild_battlegrounds/hud/guild_battlegrounds_league_platinum.png}} '''Platinum'''
| |
| ! style="text-align: center; width: 15%;" | {{sized-external-image|25px|https://foezz.innogamescdn.com/assets/guild_battlegrounds/hud/guild_battlegrounds_league_diamond.png}} '''Diamond'''
| |
| |- | | |- |
| | style="text-align: center;" | Advances needed | | | style="text-align: left;" | 4 {{sized-external-image|25px|https://foeit.innogamescdn.com/assets/shared/icons/reward_icons/reward_icon_guild_battlegrounds_chest_4.png}} |
| | style="text-align: center;" | 40 | | | style="text-align: right;" | 68 |
| | style="text-align: center;" | 70 | | | style="text-align: right;" | 68 |
| | style="text-align: center;" | 100 | | | style="text-align: right;" | 285,200 |
| | style="text-align: center;" | 130 | | | style="text-align: right;" | 97 |
| | style="text-align: center;" | 160 | | | style="text-align: right;" | 97 |
| |}
| | | style="text-align: right;" | 407,400 |
| | |
| | |
| As stated above, a province that was just taken will be under lock-down for four hours, giving the new owner some time to get victory points or build sector buildings. During lock-down, no other guild can progress their conquest flag further in that locked province.
| |
| | |
| ===Defending Provinces===
| |
| There is no means of directly defending the acquired provinces. The only way of defending your guild's provinces will be by trying to take the provinces of the attacking guild before they take yours. In this case, if the opposing guild loses all adjacent provinces they also lose all advances that they have made towards your province.
| |
| | |
| ===Focus Mechanic===
| |
| | |
| For Founders, Leaders and Battleground Oiticers of a Guild. This new functionality gives these members the option to tell their guild to focus or ignore specific provinces on the map. To access this, simply click on a province, and choose either the focus or ignore tick boxes. This will then give a visual prompt to others on which provinces to work on. The function doesn't restrict interaction with other provinces, and is designed to help coordinate, but not to remove people's freedom to choose how they want to play.
| |
| | |
| Provinces can be marked with the 'Focus' or 'Ignore' signal when they are not owned by your Guild, even if the province is currently in lockdown. Once a province has been acquired by your guild, the focus signal will be removed.
| |
| | |
| [[File:FocusMek.PNG|400px|center|link=]]
| |
| | |
| === Battleground Logs ===
| |
| | |
| | |
| | |
| [[File:Battleground Logs.png|400px|center|link=]]
| |
| | |
| | |
| | |
| {|
| |
| ! style="text-align: center; width: 30%;" |'''Log entry types'''
| |
| ! style="text-align: center; width: 70%;" |'''Description'''
| |
| |- | | |- |
| | style="text-align: center;" | Province lost | | | style="text-align: left;" | 5 {{sized-external-image|25px|https://foeit.innogamescdn.com/assets/shared/icons/reward_icons/reward_icon_guild_battlegrounds_chest_5.png}} |
| | style="text-align: center;" | This log entry show when your guild has lost the ownership of a province and which guild has conquered it | | | style="text-align: right;" | 68 |
| | | style="text-align: right;" | 68 |
| | | style="text-align: right;" | 282,300 |
| | | style="text-align: right;" | 96 |
| | | style="text-align: right;" | 96 |
| | | style="text-align: right;" | 403,200 |
| |- | | |- |
| | style="text-align: center;" | Province Conquered | | | style="text-align: left;" | 6 {{sized-external-image|25px|https://foeit.innogamescdn.com/assets/shared/icons/reward_icons/reward_icon_guild_battlegrounds_chest_6.png}} |
| | style="text-align: center;" | When a province is conquered by your Guild, your Guild will receive information regarding which player did the last action to conquer. The Guild that the province was taken from will also be displayed (unless it was not held by a Guild, and then, only the name of the province and conquering player will be shown). | | | style="text-align: right;" | 67 |
| | | style="text-align: right;" | 67 |
| | | style="text-align: right;" | 279,300 |
| | | style="text-align: right;" | 95 |
| | | style="text-align: right;" | 95 |
| | | style="text-align: right;" | 399,000 |
| |- | | |- |
| | style="text-align: center;" | Intruder Alert | | | style="text-align: left;" | 7 {{sized-external-image|25px|https://foeit.innogamescdn.com/assets/shared/icons/reward_icons/reward_icon_guild_battlegrounds_chest_7.png}} |
| | style="text-align: center;" | which will show players that have taken an action against an 'Ignored' province. Therefore, letting your Guild know who is disobeying instructions!.Important Info - In terms of the 'Intruded' log, it will only display to own Guild members, and only on an individual Guild member's first attack of the day on an 'Intruded' province. | | | style="text-align: right;" | 66 |
| | | | style="text-align: right;" | 66 |
| Further attacks during the course of the day will not trigger logs. However, another attack on the next day (on the same province), will trigger a further 'Intruded', log,
| | | style="text-align: right;" | 276,400 |
| | | style="text-align: right;" | 94 |
| | | style="text-align: right;" | 94 |
| | | style="text-align: right;" | 394,800 |
| |- | | |- |
| | style="text-align: center;" | Construction logs | | | style="text-align: left;" | 8 {{sized-external-image|25px|https://foeit.innogamescdn.com/assets/shared/icons/reward_icons/reward_icon_guild_battlegrounds_chest_8.png}} |
| | style="text-align: center;" | which will show whenever your guild build or destroy a battleground building. The log will show which province and who build/destroyed the building. | | | style="text-align: right;" | 66 |
| | | style="text-align: right;" | 66 |
| | | style="text-align: right;" | 273,500 |
| | | style="text-align: right;" | 93 |
| | | style="text-align: right;" | 93 |
| | | style="text-align: right;" | 390,600 |
| |} | | |} |
|
| |
|
| ==Battleground Leaderboard==
| |
|
| |
| At all times, the guilds will see their amount of victory points within the feature. By clicking on this component, the Leaderboard will show all participating guilds of their current battleground group, listing the rankings, guild names, number of provinces they hold, current hourly gain of victory points, total of victory points, the amount of League Points which the guild stand to win/lose and a reward preview for the given rank:
| |
|
| |
| [[FILE:MMR1.PNG|center|link=]]
| |
|
| |
| ==Victory Points==
| |
| The Victory Points are particularly used to measure and count the points towards the current battleground, thus being reset every time you join a new round. Once per hour, each province that a guild holds will provide victory points. The provinces located towards the center of the map will be the ones providing the highest amount of victory points, so aim to acquire those!
| |
|
| |
| ==Attrition==
| |
|
| |
| Whenever a player successfully completes a battle or a negotiation (in the context of a Guild Battleground) they will build up Attrition. This is a percentage value that directly aitects the (attack and defense) boosts of the defending armies and the diiticulty level of the negotiations that the player will face.
| |
|
| |
| [[FILE:attritionicongbg.png|center|link=]]
| |
|
| |
|
| So at some point, performing attacks or negotiating will become unfeasible as the defending armies become too strong and the negotiations become too complex or too expensive. However, attrition resets to 0% each day (midnight server time).
| |
| <center>
| |
| {| | | {| |
| ! style="text-align: center;" | '''Attrition Level''' | | ! style="text-align: center;" Rowspan="2" | {{sized-external-image|25px|https://foeit.innogamescdn.com/assets/shared/icons/rank.png}} Rank |
| ! style="text-align: center;" | '''Defending Army Bonus'''
| | ! style="text-align: center;" Colspan="2" | {{sized-external-image|25px|https://foeit.innogamescdn.com/assets/guild_battlegrounds/hud/guild_battlegrounds_league_copper.png}} Copper |
| ! style="text-align: center;" | '''Negotiation Multiplier'''
| | ! style="text-align: center;" Colspan="2" | {{sized-external-image|25px|https://foeit.innogamescdn.com/assets/guild_battlegrounds/hud/guild_battlegrounds_league_silver.png}} Silver |
| |-
| | ! style="text-align: center;" Colspan="2" | {{sized-external-image|25px|https://foeit.innogamescdn.com/assets/guild_battlegrounds/hud/guild_battlegrounds_league_gold.png}} Gold |
| | style="text-align: center;" | 0
| |
| | style="text-align: center;" | 0%
| |
| | style="text-align: center;" | 1
| |
| |-
| |
| | style="text-align: center;" | 1
| |
| | style="text-align: center;" | 2%
| |
| | style="text-align: center;" | 1
| |
| |-
| |
| | style="text-align: center;" | 2
| |
| | style="text-align: center;" | 4% | |
| | style="text-align: center;" | 1
| |
| |-
| |
| | style="text-align: center;" | 3
| |
| | style="text-align: center;" | 6%
| |
| | style="text-align: center;" | 1
| |
| |-
| |
| | style="text-align: center;" | 4
| |
| | style="text-align: center;" | 8%
| |
| | style="text-align: center;" | 1
| |
| |-
| |
| | style="text-align: center;" | 5
| |
| | style="text-align: center;" | 10%
| |
| | style="text-align: center;" | 1
| |
| |-
| |
| | style="text-align: center;" | 6
| |
| | style="text-align: center;" | 15%
| |
| | style="text-align: center;" | 2
| |
| |-
| |
| | style="text-align: center;" | 7
| |
| | style="text-align: center;" | 20%
| |
| | style="text-align: center;" | 2
| |
| |- | |
| | style="text-align: center;" | 8 | |
| | style="text-align: center;" | 25%
| |
| | style="text-align: center;" | 2
| |
| |-
| |
| | style="text-align: center;" | 9
| |
| | style="text-align: center;" | 30%
| |
| | style="text-align: center;" | 2
| |
| |- | |
| ! style="text-align: center;" | '''Attrition Level'''
| |
| ! style="text-align: center;" | '''Defending Army Bonus'''
| |
| ! style="text-align: center;" | '''Negotiation Multiplier''' | |
| |-
| |
| | style="text-align: center;" | 10
| |
| | style="text-align: center;" | 35%
| |
| | style="text-align: center;" | 2
| |
| |-
| |
| | style="text-align: center;" | 11
| |
| | style="text-align: center;" | 40%
| |
| | style="text-align: center;" | 2
| |
| |- | |
| | style="text-align: center;" | 12 | |
| | style="text-align: center;" | 45%
| |
| | style="text-align: center;" | 2
| |
| |-
| |
| | style="text-align: center;" | 13
| |
| | style="text-align: center;" | 50%
| |
| | style="text-align: center;" | 2
| |
| |-
| |
| | style="text-align: center;" | 14
| |
| | style="text-align: center;" | 60%
| |
| | style="text-align: center;" | 3
| |
| |-
| |
| | style="text-align: center;" | 15
| |
| | style="text-align: center;" | 70%
| |
| | style="text-align: center;" | 3
| |
| |-
| |
| | style="text-align: center;" | 16
| |
| | style="text-align: center;" | 80%
| |
| | style="text-align: center;" | 3
| |
| |-
| |
| | style="text-align: center;" | 17
| |
| | style="text-align: center;" | 90%
| |
| | style="text-align: center;" | 3
| |
| |- | | |- |
| | style="text-align: center;" | 19 | | ! style="text-align: center;" | {{sized-external-image|25px|https://foeit.innogamescdn.com/assets/shared/icons/icon_fragment.png}} Fragments of SoH |
| | style="text-align: center;" | 100% | | ! style="text-align: center;" | {{sized-external-image|25px|https://foeit.innogamescdn.com/assets/shared/icons/clan_power.png}} Power |
| | style="text-align: center;" | 3 | | ! style="text-align: center;" | {{sized-external-image|25px|https://foeit.innogamescdn.com/assets/shared/icons/icon_fragment.png}} Fragments of SoH |
| | ! style="text-align: center;" | {{sized-external-image|25px|https://foeit.innogamescdn.com/assets/shared/icons/clan_power.png}} Power |
| | ! style="text-align: center;" | {{sized-external-image|25px|https://foeit.innogamescdn.com/assets/shared/icons/icon_fragment.png}} Fragments of SoH |
| | ! style="text-align: center;" | {{sized-external-image|25px|https://foeit.innogamescdn.com/assets/shared/icons/clan_power.png}} Power |
| |- | | |- |
| | style="text-align: center;" | 19 | | | style="text-align: left;" | 1 {{sized-external-image|25px|https://foeit.innogamescdn.com/assets/shared/icons/reward_icons/reward_icon_guild_battlegrounds_chest_1.png}} |
| | style="text-align: center;" | 120% | | | style="text-align: right;" | 13 |
| | style="text-align: center;" | 4 | | | style="text-align: right;" | 54,600 |
| | | style="text-align: right;" | 39 |
| | | style="text-align: right;" | 163,800 |
| | | style="text-align: right;" | 65 |
| | | style="text-align: right;" | 273,000 |
| |- | | |- |
| ! style="text-align: center;" | '''Attrition Level'''
| | | style="text-align: left;" | 2 {{sized-external-image|25px|https://foeit.innogamescdn.com/assets/shared/icons/reward_icons/reward_icon_guild_battlegrounds_chest_2.png}} |
| ! style="text-align: center;" | '''Defending Army Bonus'''
| | | style="text-align: right;" | 12 |
| ! style="text-align: center;" | '''Negotiation Multiplier'''
| | | style="text-align: right;" | 47.900 |
| | | style="text-align: right;" | 35 |
| | | style="text-align: right;" | 143,500 |
| | | style="text-align: right;" | 57 |
| | | style="text-align: right;" | 239,000 |
| |- | | |- |
| | style="text-align: center;" | 20 | | | style="text-align: left;" | 3 {{sized-external-image|25px|https://foeit.innogamescdn.com/assets/shared/icons/reward_icons/reward_icon_guild_battlegrounds_chest_3.png}} |
| | style="text-align: center;" | 140% | | | style="text-align: right;" | 11 |
| | style="text-align: center;" | 4 | | | style="text-align: right;" | 43,300 |
| | | style="text-align: right;" | 31 |
| | | style="text-align: right;" | 129,700 |
| | | style="text-align: right;" | 52 |
| | | style="text-align: right;" | 216,100 |
| |- | | |- |
| | style="text-align: center;" | 21 | | | style="text-align: left;" | 4 {{sized-external-image|25px|https://foeit.innogamescdn.com/assets/shared/icons/reward_icons/reward_icon_guild_battlegrounds_chest_4.png}} |
| | style="text-align: center;" | 160% | | | style="text-align: right;" | 10 |
| | style="text-align: center;" | 4 | | | style="text-align: right;" | 40,800 |
| | | style="text-align: right;" | 30 |
| | | style="text-align: right;" | 122,300 |
| | | style="text-align: right;" | 49 |
| | | style="text-align: right;" | 203,000 |
| |- | | |- |
| | style="text-align: center;" | 22 | | | style="text-align: left;" | 5 {{sized-external-image|25px|https://foeit.innogamescdn.com/assets/shared/icons/reward_icons/reward_icon_guild_battlegrounds_chest_5.png}} |
| | style="text-align: center;" | 180% | | | style="text-align: right;" | 10 |
| | style="text-align: center;" | 4 | | | style="text-align: right;" | 40,400 |
| | | style="text-align: right;" | 29 |
| | | style="text-align: right;" | 121,000 |
| | | style="text-align: right;" | 48 |
| | | style="text-align: right;" | 201,600 |
| |- | | |- |
| | style="text-align: center;" | 23 | | | style="text-align: left;" | 6 {{sized-external-image|25px|https://foeit.innogamescdn.com/assets/shared/icons/reward_icons/reward_icon_guild_battlegrounds_chest_6.png}} |
| | style="text-align: center;" | 200% | | | style="text-align: right;" | 10 |
| | style="text-align: center;" | 4 | | | style="text-align: right;" | 39,900 |
| | | style="text-align: right;" | 29 |
| | | style="text-align: right;" | 119,700 |
| | | style="text-align: right;" | 48 |
| | | style="text-align: right;" | 199,000 |
| |- | | |- |
| | style="text-align: center;" | 24 | | | style="text-align: left;" | 7 {{sized-external-image|25px|https://foeit.innogamescdn.com/assets/shared/icons/reward_icons/reward_icon_guild_battlegrounds_chest_7.png}} |
| | style="text-align: center;" | 220% | | | style="text-align: right;" | 10 |
| | style="text-align: center;" | 5 | | | style="text-align: right;" | 39,500 |
| | | style="text-align: right;" | 28 |
| | | style="text-align: right;" | 118,500 |
| | | style="text-align: right;" | 47 |
| | | style="text-align: right;" | 197,400 |
| |- | | |- |
| | style="text-align: center;" | 25 | | | style="text-align: left;" | 8 {{sized-external-image|25px|https://foeit.innogamescdn.com/assets/shared/icons/reward_icons/reward_icon_guild_battlegrounds_chest_8.png}} |
| | style="text-align: center;" | 240%
| | | style="text-align: right;" | 10 |
| | style="text-align: center;" | 5
| | | style="text-align: right;" | 39,100 |
| |-
| | | style="text-align: right;" | 28 |
| | style="text-align: center;" | 26
| | | style="text-align: right;" | 117,200 |
| | style="text-align: center;" | 260% | | | style="text-align: right;" | 47 |
| | style="text-align: center;" | 5 | | | style="text-align: right;" | 195,300 |
| |-
| |
| | style="text-align: center;" | 27 | |
| | style="text-align: center;" | 280% | |
| | style="text-align: center;" | 5 | |
| |-
| |
| | style="text-align: center;" | 28 | |
| | style="text-align: center;" | 300% | |
| | style="text-align: center;" | 5
| |
| |-
| |
| | style="text-align: center;" | 29
| |
| | style="text-align: center;" | 320%
| |
| | style="text-align: center;" | 6
| |
| |-
| |
| | style="text-align: center;" | 30
| |
| | style="text-align: center;" | 340%
| |
| | style="text-align: center;" | 6
| |
| |} | | |} |
| </center>
| |
| If you're curious about the other data, you can take a look at the full table [[Guild Battlegrounds Attrition Table|Attrition Table]] page.
| |
|
| |
| ==League System==
| |
| To ensure that there’s no substantial diiterence between the participating guilds on each Battleground map, we will have a League System made up of five distinct league categories: Copper, Silver, Gold, Platinum and Diamond. Newly arrived guilds will be positioned in the Copper league.
| |
|
| |
|
|
| |
|
| {|
| |
| ! style="text-align: center; width: 20%;" | '''Copper'''
| |
| ! style="text-align: center; width: 20%;" | '''Silver'''
| |
| ! style="text-align: center; width: 20%;" | '''Gold'''
| |
| ! style="text-align: center; width: 20%;" | '''Platinum'''
| |
| ! style="text-align: center; width: 20%;" | '''Diamond'''
| |
| |-
| |
| | style="text-align: center;" | https://foezz.innogamescdn.com/assets/guild_battlegrounds/hud/guild_battlegrounds_league_copper.png
| |
| | style="text-align: center;" | https://foezz.innogamescdn.com/assets/guild_battlegrounds/hud/guild_battlegrounds_league_silver.png
| |
| | style="text-align: center;" | https://foezz.innogamescdn.com/assets/guild_battlegrounds/hud/guild_battlegrounds_league_gold.png
| |
| | style="text-align: center;" | https://foezz.innogamescdn.com/assets/guild_battlegrounds/hud/guild_battlegrounds_league_platinum.png
| |
| | style="text-align: center;" | https://foezz.innogamescdn.com/assets/guild_battlegrounds/hud/guild_battlegrounds_league_diamond.png
| |
| |}
| |
|
| |
|
| ===League Points ===
| |
| A Guilds League points (LP formerly known as MMR) decides which league the guild is placed in. Every time a guild participates in a Battleground it will aquire league points based on its placement in the final league result.
| |
|
| |
|
| The number of League Points can never go below 0 or above 1000.
| | [[FILE:GBGRewards6.png|center|link=]] |
|
| |
|
| | '''Note:''' 50% of the time, the immediate reward will be one fragment for the Statue of Honor Selection kit. |
|
| |
|
| {| | | {| |
| ! style="text-align: center; width: 20%;" | '''League''' | | ! style="text-align: center; width: 20%;" | [[Statue of Honor - Lv. 1]] |
| ! style="text-align: center; width: 20%;" | '''League Points'''
| | ! style="text-align: center; width: 20%;" | [[Statue of Honor - Lv. 2]] |
| |-
| | ! style="text-align: center; width: 20%;" | [[Statue of Honor - Lv. 3]] |
| | style="text-align: center; width: 15%;" | {{sized-external-image|25px|https://foezz.innogamescdn.com/assets/guild_battlegrounds/hud/guild_battlegrounds_league_diamond.png}} '''Diamond'''
| | ! style="text-align: center; width: 20%;" | [[Statue of Honor - Lv. 4]] |
| | style="text-align: center; width: 20%;" | '''901-1000'''
| |
| |-
| |
| | style="text-align: center; width: 15%;" | {{sized-external-image|25px|https://foezz.innogamescdn.com/assets/guild_battlegrounds/hud/guild_battlegrounds_league_platinum.png}} '''Platinum'''
| |
| | style="text-align: center; width: 20%;" | '''651-900'''
| |
| |-
| |
| | style="text-align: center; width: 15%;" | {{sized-external-image|25px|https://foezz.innogamescdn.com/assets/guild_battlegrounds/hud/guild_battlegrounds_league_gold.png}} '''Gold'''
| |
| | style="text-align: center; width: 20%;" | '''351-650'''
| |
| |-
| |
| | style="text-align: center; width: 15%;" | {{sized-external-image|25px|https://foezz.innogamescdn.com/assets/guild_battlegrounds/hud/guild_battlegrounds_league_silver.png}} '''Silver'''
| |
| | style="text-align: center; width: 20%;" | '''101-350'''
| |
| |-
| |
| | style="text-align: center; width: 15%;" | {{sized-external-image|25px|https://foezz.innogamescdn.com/assets/guild_battlegrounds/hud/guild_battlegrounds_league_copper.png}} '''Copper'''
| |
| | style="text-align: center; width: 20%;" | '''0-100'''
| |
| |}
| |
| | |
| | |
| Depending on the placement and the number of opponents in the battleground the LP is adjusted according to the table below:
| |
| | |
| {|
| |
| ! style="text-align: center; width: 20%;" | '''Placement'''
| |
| ! style="text-align: center; width: 20%;" | '''8 Guilds'''
| |
| ! style="text-align: center; width: 20%;" | '''7 Guilds'''
| |
| ! style="text-align: center; width: 20%;" | '''6 Guilds'''
| |
| ! style="text-align: center; width: 20%;" | '''5 Guilds'''
| |
| |-
| |
| | style="text-align: center; width: 20%;" | '''1st place'''
| |
| | style="text-align: center; width: 20%;" | '''+175'''
| |
| | style="text-align: center; width: 20%;" | '''+150'''
| |
| | style="text-align: center; width: 20%;" | '''+125'''
| |
| | style="text-align: center; width: 20%;" | '''+100'''
| |
| |-
| |
| | style="text-align: center; width: 20%;" | '''2nd place'''
| |
| | style="text-align: center; width: 20%;" | '''+125'''
| |
| | style="text-align: center; width: 20%;" | '''+100'''
| |
| | style="text-align: center; width: 20%;" | '''+75'''
| |
| | style="text-align: center; width: 20%;" | '''+50'''
| |
| |-
| |
| | style="text-align: center; width: 20%;" | '''3rd place'''
| |
| | style="text-align: center; width: 20%;" | '''+75'''
| |
| | style="text-align: center; width: 20%;" | '''+50'''
| |
| | style="text-align: center; width: 20%;" | '''+25'''
| |
| | style="text-align: center; width: 20%;" | '''0'''
| |
| |-
| |
| | style="text-align: center; width: 20%;" | '''4th place'''
| |
| | style="text-align: center; width: 20%;" | '''+25'''
| |
| | style="text-align: center; width: 20%;" | '''0'''
| |
| | style="text-align: center; width: 20%;" | '''-25'''
| |
| | style="text-align: center; width: 20%;" | '''-50'''
| |
| |-
| |
| | style="text-align: center; width: 20%;" | '''5th place'''
| |
| | style="text-align: center; width: 20%;" | '''-25'''
| |
| | style="text-align: center; width: 20%;" | '''-50'''
| |
| | style="text-align: center; width: 20%;" | '''-75'''
| |
| | style="text-align: center; width: 20%;" | '''-100'''
| |
| |-
| |
| | style="text-align: center; width: 20%;" | '''6th place'''
| |
| | style="text-align: center; width: 20%;" | '''-75'''
| |
| | style="text-align: center; width: 20%;" | '''-100'''
| |
| | style="text-align: center; width: 20%;" | '''-125'''
| |
| | style="text-align: center; width: 20%;" |
| |
| |- | | |- |
| | style="text-align: center; width: 20%;" | '''7th place''' | | | {{sized-external-image|175px|https://foeit.innogamescdn.com/assets/city/buildings/R_SS_MultiAge_Battlegrounds1a.png}} |
| | style="text-align: center; width: 20%;" | '''-125''' | | | {{sized-external-image|175px|https://foeit.innogamescdn.com/assets/city/buildings/R_SS_MultiAge_Battlegrounds1b.png}} |
| | style="text-align: center; width: 20%;" | '''-150''' | | | {{sized-external-image|175px|https://foeit.innogamescdn.com/assets/city/buildings/R_SS_MultiAge_Battlegrounds1c.png}} |
| | style="text-align: center; width: 20%;" |
| | | {{sized-external-image|175px|https://foeit.innogamescdn.com/assets/city/buildings/R_SS_MultiAge_Battlegrounds1d.png}} |
| | style="text-align: center; width: 20%;" | | |
| |- | | |- |
| | style="text-align: center; width: 20%;" | '''8th place'''
| | ! style="text-align: center; width: 20%;" | [[Statue of Honor - Lv. 5]] |
| | style="text-align: center; width: 20%;" | '''-175'''
| | ! style="text-align: center; width: 20%;" | [[Statue of Honor - Lv. 6]] |
| | style="text-align: center; width: 20%;" |
| | ! style="text-align: center; width: 20%;" | [[Statue of Honor - Lv. 7]] |
| | style="text-align: center; width: 20%;" |
| | ! style="text-align: center; width: 20%;" | [[Statue of Honor - Lv. 8]] |
| | style="text-align: center; width: 20%;" |
| |
| |- | | |- |
| | | {{sized-external-image|175px|https://foeit.innogamescdn.com/assets/city/buildings/R_SS_MultiAge_Battlegrounds1e.png}} |
| | | {{sized-external-image|[[File:R_SS_MultiAge_Battlegrounds1f.png|175px|link=]] |
| | | {{sized-external-image|[[File:R_SS_MultiAge_Battlegrounds1g.png|175px|link=]] |
| | | {{sized-external-image|[[File:R_SS_MultiAge_Battlegrounds1h.png|175px|link=]] |
| |} | | |} |
|
| |
|
| ==Province Buildings== | | ===Individual Rewards=== |
| {{:Guild_Battlegrounds_Province_Buildings}}
| | Apart from rewards for your guild, there are also individual rewards, whenever you contribute by fighting or negotiating, there is a chance to win some [[Forge Points]], [[Goods]], a [[Units List|military unit]], attacker boost or even [[Diamonds]]. |