Pagina Test: differenze tra le versioni
Nessun oggetto della modifica |
Nessun oggetto della modifica |
||
| Riga 1: | Riga 1: | ||
[[File:STPATRICK_Loading_Screen.png|center|link=]]<br> | |||
<center><font color=# | |||
</font></center>''<br> | <center><font color=#008000>'''"Salve amico! Che sia per te il migliore di tutti i buongiorno! Il Giorno di San Patrizio è quasi alle porte e tu devi essere quello che'''<br> | ||
[[File: | '''è venuto ad aiutarci a prepararci per i grandi festeggiamenti... Ho ragione?"''' | ||
<br> | </font></center>''<br>'' | ||
[[File:StPatricksmain.png|300px|link=|left]]<br> __TOC__<br> | |||
Il Giorno di San Patrizio è quasi arrivato, e, quest'anno, hai ricevuto una chiamata di aiuto da una città vicina. Stanno cercando la tua assistenza per poter celebrare una gran festa! Il tuo compito è di aiutare la gente della città a prepararsi per l'occasione importante, e guardando bene, hai il tuo bel daffare! Paddy McCharms è la guida del festival, quindi assicurati di ascoltarlo mentre ti mostra la città, introducendoti ai cittadini che ti aiuteranno nella tua missione per organizzare il miglior festival di San Patrizio di sempre! | |||
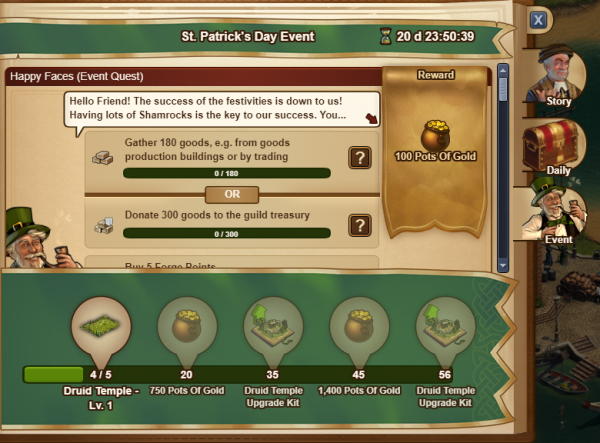
==Come posso partecipare all'Evento di San Patrizio?== | |||
Completa le missioni per ottenere le Pentole d'Oro. Ci sono 56 missioni da completare, 35 tutte d'un fiato e successivamente 1 per ogni giorno dell'evento. Puoi trovare ulteriori Pentole d'Oro negli incidenti attorno alla tua città. Usale nella finestra principale dell'evento per preparare le celebrazioni. Puoi anche comprarle con i diamanti, se hai bisogno. | |||
[[File:QuestlinePatricks.png|600px|link=]]<br> | |||
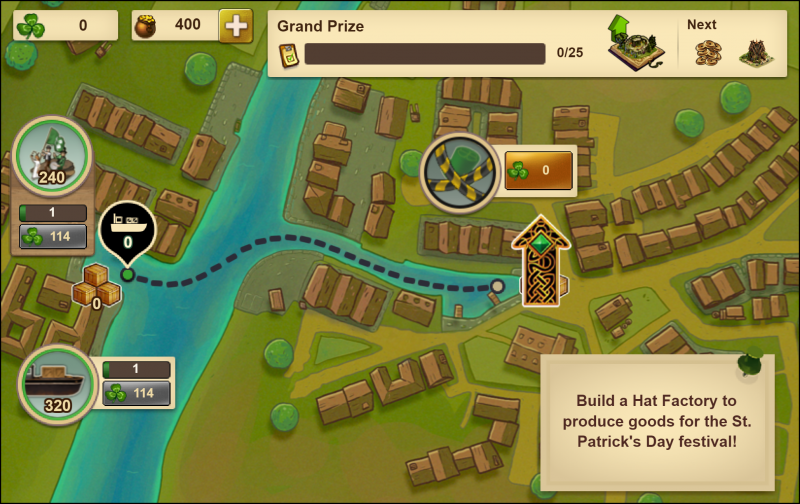
Appena apri la finestra dell'evento, vedrai una mappa della città. Sul lato sinistro trovi il festival. Verso il centro vedrai una delle fabbriche della città. Cliccando su di essa, avvierai la produzione dei beni per il festival. Una volta che la produzione è completa, i beni verranno messi nei containers pronti per la raccolta. Cliccando sul traghetto nel pulsante nell'angolo a sinistra, manderai i beni raccolti dalla città verso il festival. Una volta che il traghetto arriva al festival, clicca su quest'ultimo per raccogliere i beni e ottenere i Trifogli! | |||
[[File:Maineventwindow.png|800px|center|link=]]<br> | |||
===Map=== | |||
Utilizza questi Trifogli per aggiornare e migliorare le tue fabbriche, aumentando e massimizzando la produzione. Puoi anche aggiornare il tuo traghetto, così come il festival per aumentare il quantitativo di beni che il traghetto può trasportare attraverso il fiume, così come puoi aumentare la velocità con cui il festival utilizza i beni. Se raccogli sufficienti Trifogli e non vuoi aumentare gradualmente le produzioni, metti la spunta sul pulsante "Max" nell'angolo a sinistra per aggiornarli più velocemente (questo ti permetterà di investire un certo quantitativo di pentole d'oro in una singola fabbrica solo con un click). Inoltre, se vuoi, puoi spendere le Pentole d'Oro per progredire istantaneamente di 2, 4 o 8 ore. Questo è un modo veloce per produrre Trifogli aggiuntivi se ne necessiti. | |||
Per aiutarti a iniziare bene puoi anche leggere la nostra [[Evento del giorno di San Patrizio - Guida introduttiva|Guida introduttiva]] | |||
= | [[File:PaddiesGIF.gif|center|link=]]<br> | ||
[[File: | Ma gestire queste fabbriche non è tutto ciò che puoi fare. Paddy ha un suggerimento per rendere la tua vita ancora più facile! Ti introdurrà alcuni giovani che, per una tassa, gestiranno le tue fabbriche. Clicca sul cappello ([[File:tinyhat.png|25px|link=]]) per assumere un manager con le Pentole D'oro. Assumendolo, non solo ti darà l'opportunità di migliorare la produzione delle tue fabbriche, ma anche di automatizzarla, che significa che non dovrai cliccare ulteriormente sulla fabbrica! Puoi anche assumere un Festival Manager che automaticamente gestirà il festival in tua assenza e un Traghettatore che automatizzerà il trasporto dei beni. | ||
[[File:manager2patricks.png|400px|center|link=]] | |||
=== Il festival === | |||
Il | |||
{| style="width: 100%; | |||
!style="text-align: center; font-weight: bold; background-color:#145E3D;" |[[File:stpatrick_image_building_parades.png|link=|100px]] | |||
| style="text-align:center;"|Il festival è dove vendi tutti i tuoi beni per ottenere i quadrifogli[[File:Stpatrick icon idlecurrency.png|link=|25px]]. Il festival si trova dalla parte opposta del fiume rispetto alle fabbriche, quindi è necessario trasportare i beni da una sponda all'altra con la nave. Una volta arrivati tu o il tuo manager potrete venderli.<br> | |||
|} | |||
== | === Il Cantiere Navale === | ||
{| style="width: 100%; | |||
!style="text-align: center; font-weight: bold; background-color:#145E3D;" |[[File:stpatrick_image_building_ship.png|link=|100px]] | |||
|style="text-align:center;"|Il cantiere navale è il luogo in cui mantieni ed espandi il tuo traghetto. Questo costa quadrifogli [[File:Stpatrick icon idlecurrency.png|link=|25px]]. Più aggiorni il tuo traghetto, più beni può trasportare attraverso il fiume e più velocemente naviga. | |||
|} | |||
=== Edifici per i beni === | |||
Esistono cinque diversi edifici per i beni. Ognuno produce diverse quantità di beni del festival. La fabbrica di cappelli è immediatamente disponibile quando inizia l'evento e gli altri quattro possono essere sbloccati spendendo quadrifogli [[File:Stpatrick icon idlecurrency.png|link=|25px]]. | |||
{| style="width: | Quando un edificio sarà disponibile, sarà al livello 1. Puoi usare i quadrifogli per aumentare la produzione nei tuoi edifici. Mentre ogni singolo livello aumenterà la produzione del tuo edificio, raggiungere determinati livelli sbloccherà i moltiplicatori di produzione. | ||
{| style="width: 40%; | |||
!style="text-align: center; font-weight: bold; background-color:#145E3D;"|Livelli | |||
!style="text-align: center; font-weight: bold; background-color:#145E3D;"|Moltiplicatori | |||
! style="text-align: center; font-weight: bold; background-color: # | |||
! style="text-align: center; font-weight: bold; background-color:# | |||
|- | |- | ||
! style="text-align: center; font-weight: bold | !style="text-align: center; font-weight: bold;"|1-10 | ||
!style="text-align: center; font-weight: bold;"|1 | |||
|- | |- | ||
!style="text-align: center; font-weight: bold;"|11-25 | |||
!style="text-align: center; font-weight: bold;"|2 | |||
|- | |- | ||
!style="text-align: center; font-weight: bold;"|26-50 | |||
!style="text-align: center; font-weight: bold;"|4 | |||
|- | |- | ||
!style="text-align: center; font-weight: bold;"|51-100 | |||
!style="text-align: center; font-weight: bold;"|8 | |||
|- | |- | ||
!style="text-align: center; font-weight: bold;"|101-200 | |||
!style="text-align: center; font-weight: bold;"|16 | |||
|- | |- | ||
!style="text-align: center; font-weight: bold;"|201-300 | |||
!style="text-align: center; font-weight: bold;"|32 | |||
|- | |- | ||
|} | |} | ||
{| style="width: 50%; | |||
!style="text-align: center; font-weight: bold; background-color:#145E3D;"|Edificio | |||
!style="text-align: center; font-weight: bold; background-color:#145E3D;"|Descrizione | |||
!style="text-align: center; font-weight: bold; background-color:#145E3D;"|Costo per sbloccare <br> | |||
|- | |||
!style="text-align: center; font-weight: bold; background-color:#145E3D;" |[[File:stpatrick_image_building_hatfactory.png|link=|100px]] | |||
|style="text-align:center;"|Fabbrica di cappelli | |||
|style="text-align: center; font-weight: bold;"|Gratis <br> | |||
|- | |||
!style="text-align: center; font-weight: bold; background-color:#145E3D;" |[[File:stpatrick_image_building_flowersfactory.png|link=|100px]] | |||
|style="text-align:center;"|Vivaio | |||
|style="text-align: center; font-weight: bold;"|1.1K [[File:Stpatrick icon idlecurrency.png|link=|25px]] <br> | |||
|- | |||
!style="text-align: center; font-weight: bold; background-color:#145E3D;" |[[File:stpatrick_image_building_cakefactory.png|link=|100px]] | |||
|style="text-align:center;"|Fabbrica di torte | |||
|style="text-align: center; font-weight: bold;"|1.2M [[File:Stpatrick icon idlecurrency.png|link=|25px]] <br> | |||
|- | |||
!style="text-align: center; font-weight: bold; background-color:#145E3D;" |[[File:stpatrick_image_building_factory.png|link=|100px]] | |||
|style="text-align:center;"|Fabbrica di bevande | |||
|style="text-align: center; font-weight: bold;"|1.5B [[File:Stpatrick icon idlecurrency.png|link=|25px]]<br> | |||
|- | |||
!style="text-align: center; font-weight: bold; background-color:#145E3D;" |[[File:stpatrick_image_building_firefactory.png|link=|100px]] | |||
|style="text-align:center;"|Fabbrica di fuochi d'artificio | |||
|style="text-align: center; font-weight: bold;"|111B [[File:Stpatrick icon idlecurrency.png|link=|25px]] <br> | |||
|} | |||
=== | === I Manager === | ||
Fai clic sul cappello a cilindro per assumere un manager per le pentole d'oro. Assumere un manager automatizza la produzione di beni, il che significa che non devi più fare clic sulla tua fabbrica. E non solo, migliorerà ulteriormente la produzione della fabbrica! Assumi un direttore del festival per gestire automaticamente il festival al tuo posto e un direttore del cantiere navale per automatizzare la spedizione dei beni al festival. | |||
{| style="width: 100%; | |||
!style="text-align: center; font-weight: bold; background-color:#145E3D;"|Livelli | |||
!style="text-align: center; font-weight: bold; background-color:#145E3D;"|[[File:Stpatrick image manager market.png|link=|100px]]Manager del Festival | |||
!style="text-align: center; font-weight: bold; background-color:#145E3D;"|[[File:Stpatrick image manager transport.png|link=|100px]] Manager del cantiere navale | |||
!style="text-align: center; font-weight: bold; background-color:#145E3D;"|[[File:Stpatrick image manager hats.png|link=|100px]] Manager della fabbrica di capelli | |||
{|style="width: | !style="text-align: center; font-weight: bold; background-color:#145E3D;"|[[File:stpatrick_image_manager_flowers.png|link=|100px]]Manager del vivaio | ||
| style="text-align:center;"| [[File: | !style="text-align: center; font-weight: bold; background-color:#145E3D;"|[[File:Stpatrick image manager cakes.png|link=|100px]]Manager della fabbrica di torte | ||
| style="text-align:center;"|[[File: | !style="text-align: center; font-weight: bold; background-color:#145E3D;"|[[File:Stpatrick image manager factory.png|link=|100px]]Manager della fabbrica di bevande | ||
| style="text-align:center;"|[[File: | !style="text-align: center; font-weight: bold; background-color:#145E3D;"|[[File:Stpatrick image manager fireworks.png|link=|100px]]Manager della Fabbrica dei fuochi d'artificio<br> | ||
|- | |||
!style="text-align: center; font-weight: bold; background-color:#145E3D;"|Level 1 | |||
!style="text-align: center; font-weight: bold;"|20[[File:Stpatrick image currency event.png|link=|link=|25px]] | |||
!style="text-align: center; font-weight: bold;"|20[[File:Stpatrick image currency event.png|link=|link=|25px]] | |||
!style="text-align: center; font-weight: bold;"|10[[File:Stpatrick image currency event.png|link=|link=|25px]] | |||
!style="text-align: center; font-weight: bold;"|20[[File:Stpatrick image currency event.png|link=|link=|25px]] | |||
!style="text-align: center; font-weight: bold;"|30[[File:Stpatrick image currency event.png|link=|link=|25px]] | |||
!style="text-align: center; font-weight: bold;"|40[[File:Stpatrick image currency event.png|link=|link=|25px]] | |||
!style="text-align: center; font-weight: bold;"|50[[File:Stpatrick image currency event.png|link=|link=|25px]] | |||
|- | |- | ||
| style="text-align:center;"|[[ | !style="text-align: center; font-weight: bold;background-color:#145E3D;"|Level 2 | ||
!style="text-align: center; font-weight: bold;"|40[[File:Stpatrick image currency event.png|link=|link=|25px]] | |||
!style="text-align: center; font-weight: bold;"|40[[File:Stpatrick image currency event.png|link=|link=|25px]] | |||
!style="text-align: center; font-weight: bold;"|20[[File:Stpatrick image currency event.png|link=|link=|25px]] | |||
!style="text-align: center; font-weight: bold;"|40[[File:Stpatrick image currency event.png|link=|link=|25px]] | |||
!style="text-align: center; font-weight: bold;"|60[[File:Stpatrick image currency event.png|link=|link=|25px]] | |||
!style="text-align: center; font-weight: bold;"|80[[File:Stpatrick image currency event.png|link=|link=|25px]] | |||
!style="text-align: center; font-weight: bold;"|100[[File:Stpatrick image currency event.png|link=|link=|25px]] | |||
|- | |- | ||
| style="text-align: center;" | !style="text-align: center; font-weight: bold;background-color:#145E3D;"|Level 3 | ||
!style="text-align: center; font-weight: bold;"|80[[File:Stpatrick image currency event.png|link=|25px]] | |||
!style="text-align: center; font-weight: bold;"|80[[File:Stpatrick image currency event.png|link=|25px]] | |||
!style="text-align: center; font-weight: bold;"|30[[File:Stpatrick image currency event.png|link=|25px]] | |||
!style="text-align: center; font-weight: bold;"|60[[File:Stpatrick image currency event.png|link=|25px]] | |||
!style="text-align: center; font-weight: bold;"|90[[File:Stpatrick image currency event.png|link=|25px]] | |||
!style="text-align: center; font-weight: bold;"|120[[File:Stpatrick image currency event.png|link=|25px]] | |||
!style="text-align: center; font-weight: bold;"|150[[File:Stpatrick image currency event.png|link=|25px]] | |||
|- | |- | ||
| style="text-align: center;" | !style="text-align: center; font-weight: bold;background-color:#145E3D;"|Level 4 | ||
[[File: | !style="text-align: center; font-weight: bold;"|150[[File:Stpatrick image currency event.png|link=|25px]] | ||
[[File: | !style="text-align: center; font-weight: bold;"|150[[File:Stpatrick image currency event.png|link=|25px]] | ||
!style="text-align: center; font-weight: bold;"|50[[File:Stpatrick image currency event.png|link=|25px]] | |||
!style="text-align: center; font-weight: bold;"|100[[File:Stpatrick image currency event.png|link=|25px]] | |||
!style="text-align: center; font-weight: bold;"|150[[File:Stpatrick image currency event.png|link=|25px]] | |||
!style="text-align: center; font-weight: bold;"|200[[File:Stpatrick image currency event.png|link=|25px]] | |||
!style="text-align: center; font-weight: bold;"|250[[File:Stpatrick image currency event.png|link=|25px]] | |||
|- | |- | ||
| style="text-align: center;" | !style="text-align: center; font-weight: bold;background-color:#145E3D;"|Level 5 | ||
!style="text-align: center; font-weight: bold;"|300[[File:Stpatrick image currency event.png|link=|25px]] | |||
!style="text-align: center; font-weight: bold;"|300[[File:Stpatrick image currency event.png|link=|25px]] | |||
!style="text-align: center; font-weight: bold;"|100[[File:Stpatrick image currency event.png|link=|25px]] | |||
!style="text-align: center; font-weight: bold;"|200[[File:Stpatrick image currency event.png|link=|25px]] | |||
!style="text-align: center; font-weight: bold;"|300[[File:Stpatrick image currency event.png|link=|25px]] | |||
!style="text-align: center; font-weight: bold;"|400[[File:Stpatrick image currency event.png|link=|25px]] | |||
!style="text-align: center; font-weight: bold;"|500[[File:Stpatrick image currency event.png|link=|25px]] | |||
|- | |- | ||
|} | |||
== Next Town == | |||
Now this is all great, but what's in it for you? As you'll see, along the top of the event window, there are a list of three tasks. Completing a task will prompt you to collect the task, which will contribute progress towards your Grand Prize. Collect 25 tasks to earn the Grand Prize reward! If you're not sure what you need to do for a task, click on the arrow on the right side of the list for a full overview. Once you complete a task, click to collect it, and it will be replaced with a new task, allowing you to work towards more Grand Prize progress. | |||
[[File: | [[File:Tasks.png|center|600px|link=]] | ||
Please note that you don't necessarily need to collect all tasks in order to proceed and unlock a new town. As soon as you gather 8.4 quadrillions of Shamrock, you can click in "continue" to advance and still keep your grand prize progress (in other words, the task progress). Once you've selected your stage prizes, the town progress will be reset and this gives you the chance to start the production over, and earn yourself even more Grand Prizes. | |||
[[File:Shamrockfinish.png|center|200px|link=]] | |||
[[File: | This button will light up as soon as you have 8.4Q Shamrocks | ||
== | == Rewards == | ||
Eventually, however, Paddy won't have any more tasks for you to complete. Once you reach this point, click on the 'Next Stage' button in the bottom right to be presented with some end of stage reward boxes. With the Luck of the Irish, snag yourself some fantastic prizes from each box. You can open one container for free, and more containers for Pots of Gold. These costs will increase gradually the more boxes you open using Pots of Gold. Once you've collected all 6, you'll earn the collection reward at the top bar, and if you want, you can open a new set of 6 reward boxes before advancing to the next town. | |||
[[File:PatricksBox.png|center|600px|link=]] | |||
The table below details the cost of opening reward boxes from the end of stage collection screen. The costs continue to scale with each new set of 6 reward boxes. | |||
[[File: | {| style="width: 100%; | ||
!style="text-align: center; font-weight: bold; background-color:#145E3D;"|Reward Box | |||
!style="text-align: center; font-weight: bold; background-color:#145E3D;"|First | |||
[[File: | !style="text-align: center; font-weight: bold; background-color:#145E3D;"|Second | ||
!style="text-align: center; font-weight: bold; background-color:#145E3D;"|Third | |||
|- | |||
!style="text-align: center; font-weight: bold; background-color:#145E3D;"|Reward Box 1 | |||
!style="text-align: center; font-weight: bold;"|Free | |||
!style="text-align: center; font-weight: bold;"|50[[File:Stpatrick image currency event.png|link=|25px]] | |||
!style="text-align: center; font-weight: bold;"|100[[File:Stpatrick image currency event.png|link=|25px]] | |||
|- | |||
!style="text-align: center; font-weight: bold;background-color:#145E3D;"|Reward Box 2 | |||
!style="text-align: center; font-weight: bold;"|50[[File:Stpatrick image currency event.png|link=|25px]] | |||
!style="text-align: center; font-weight: bold;"|100[[File:Stpatrick image currency event.png|link=|25px]] | |||
!style="text-align: center; font-weight: bold;"|250[[File:Stpatrick image currency event.png|link=|25px]] | |||
|- | |||
!style="text-align: center; font-weight: bold;background-color:#145E3D;"|Reward Box 3 | |||
!style="text-align: center; font-weight: bold;"|100[[File:Stpatrick image currency event.png|link=|25px]] | |||
!style="text-align: center; font-weight: bold;"|250[[File:Stpatrick image currency event.png|link=|25px]] | |||
!style="text-align: center; font-weight: bold;"|500[[File:Stpatrick image currency event.png|link=|25px]] | |||
|- | |||
!style="text-align: center; font-weight: bold; background-color:#145E3D;"|Reward Box 4 | |||
!style="text-align: center; font-weight: bold;"|250[[File:Stpatrick image currency event.png|link=|25px]] | |||
!style="text-align: center; font-weight: bold;"|500[[File:Stpatrick image currency event.png|link=|25px]] | |||
!style="text-align: center; font-weight: bold;"|1000[[File:Stpatrick image currency event.png|link=|25px]] | |||
|- | |||
!style="text-align: center; font-weight: bold;background-color:#145E3D;"|Reward Box 5 | |||
!style="text-align: center; font-weight: bold;"|500[[File:Stpatrick image currency event.png|link=|25px]] | |||
!style="text-align: center; font-weight: bold;"|1000[[File:Stpatrick image currency event.png|link=|25px]] | |||
!style="text-align: center; font-weight: bold;"|2000[[File:Stpatrick image currency event.png|link=|25px]] | |||
|- | |||
!style="text-align: center; font-weight: bold;background-color:#145E3D;"|Reward Box 6 | |||
!style="text-align: center; font-weight: bold;"|1000[[File:Stpatrick image currency event.png|link=|25px]] | |||
!style="text-align: center; font-weight: bold;"|2000[[File:Stpatrick image currency event.png|link=|25px]] | |||
!style="text-align: center; font-weight: bold;"|4000[[File:Stpatrick image currency event.png|link=|25px]] | |||
|- | |||
|} | |||
===Druid Temple=== | |||
The main Grand Prize reward for the St. Patrick's Day event is the brand new Druid Temple upgradable building. This gorgeous 5x4 upgradable building has 10 levels, and once you upgrade yours to its maximum level, the Druid Temple will provide you with defense boost for attacking army, random goods and a generous additional random production, besides population and coins on top of that. | |||
{| | {| | ||
|style="vertical-align:center;"| | |style="vertical-align:center;"|[[File:Druid Temple 10.png|400px|link=]] | ||
| | |On level 10, this building provides up to: | ||
*[[File:tinypop.png|20px]]Population | |||
*[[File:tinycoins.png|20px]]Coins | |||
*[[File:tinydef.png|20px]]+28% defense for attacking army | |||
*[[File:tinygoods.png|20px]]+20 random goods | |||
<br> | |||
[[File:more.png|20px]]+1 Random production that may vary between: | |||
*[[File:tinyfp.png|20px]]+25 Forge Points (40%) | |||
*[[File:tinygoods.png|20px]]+25 Goods (40%) | |||
*[[File:Tiny Medals.png|20px]]Medals (15%) | |||
*[[File:Tinysupplies.png|20px]]Supplies (5%) | |||
|} | |} | ||
See all levels and the building stats for the Druid Temple [[Druid_Temple_-_Lv._1|here]] | |||
=== | ===St. Patrick's Day Event Avatars=== | ||
Lastly, as always, you'll get to show off your progress to your friends and neighbors, by obtaining one of the two themed portraits. | |||
<br><br> | |||
[[File:PatrickAvatars.png|center|400px|link=]] | |||
| | |||
Versione delle 23:19, 12 feb 2021
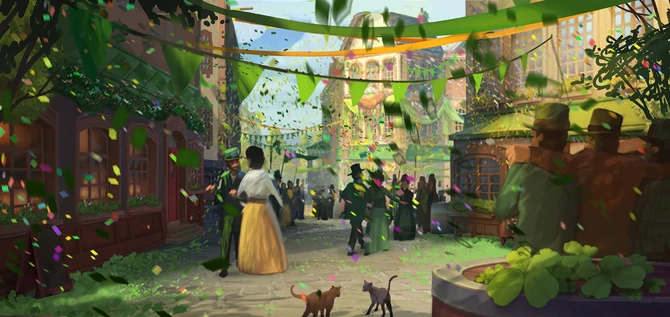
è venuto ad aiutarci a prepararci per i grandi festeggiamenti... Ho ragione?"

Il Giorno di San Patrizio è quasi arrivato, e, quest'anno, hai ricevuto una chiamata di aiuto da una città vicina. Stanno cercando la tua assistenza per poter celebrare una gran festa! Il tuo compito è di aiutare la gente della città a prepararsi per l'occasione importante, e guardando bene, hai il tuo bel daffare! Paddy McCharms è la guida del festival, quindi assicurati di ascoltarlo mentre ti mostra la città, introducendoti ai cittadini che ti aiuteranno nella tua missione per organizzare il miglior festival di San Patrizio di sempre!
Come posso partecipare all'Evento di San Patrizio?
Completa le missioni per ottenere le Pentole d'Oro. Ci sono 56 missioni da completare, 35 tutte d'un fiato e successivamente 1 per ogni giorno dell'evento. Puoi trovare ulteriori Pentole d'Oro negli incidenti attorno alla tua città. Usale nella finestra principale dell'evento per preparare le celebrazioni. Puoi anche comprarle con i diamanti, se hai bisogno.
Appena apri la finestra dell'evento, vedrai una mappa della città. Sul lato sinistro trovi il festival. Verso il centro vedrai una delle fabbriche della città. Cliccando su di essa, avvierai la produzione dei beni per il festival. Una volta che la produzione è completa, i beni verranno messi nei containers pronti per la raccolta. Cliccando sul traghetto nel pulsante nell'angolo a sinistra, manderai i beni raccolti dalla città verso il festival. Una volta che il traghetto arriva al festival, clicca su quest'ultimo per raccogliere i beni e ottenere i Trifogli!
Map
Utilizza questi Trifogli per aggiornare e migliorare le tue fabbriche, aumentando e massimizzando la produzione. Puoi anche aggiornare il tuo traghetto, così come il festival per aumentare il quantitativo di beni che il traghetto può trasportare attraverso il fiume, così come puoi aumentare la velocità con cui il festival utilizza i beni. Se raccogli sufficienti Trifogli e non vuoi aumentare gradualmente le produzioni, metti la spunta sul pulsante "Max" nell'angolo a sinistra per aggiornarli più velocemente (questo ti permetterà di investire un certo quantitativo di pentole d'oro in una singola fabbrica solo con un click). Inoltre, se vuoi, puoi spendere le Pentole d'Oro per progredire istantaneamente di 2, 4 o 8 ore. Questo è un modo veloce per produrre Trifogli aggiuntivi se ne necessiti.
Per aiutarti a iniziare bene puoi anche leggere la nostra Guida introduttiva
Ma gestire queste fabbriche non è tutto ciò che puoi fare. Paddy ha un suggerimento per rendere la tua vita ancora più facile! Ti introdurrà alcuni giovani che, per una tassa, gestiranno le tue fabbriche. Clicca sul cappello (![]() ) per assumere un manager con le Pentole D'oro. Assumendolo, non solo ti darà l'opportunità di migliorare la produzione delle tue fabbriche, ma anche di automatizzarla, che significa che non dovrai cliccare ulteriormente sulla fabbrica! Puoi anche assumere un Festival Manager che automaticamente gestirà il festival in tua assenza e un Traghettatore che automatizzerà il trasporto dei beni.
) per assumere un manager con le Pentole D'oro. Assumendolo, non solo ti darà l'opportunità di migliorare la produzione delle tue fabbriche, ma anche di automatizzarla, che significa che non dovrai cliccare ulteriormente sulla fabbrica! Puoi anche assumere un Festival Manager che automaticamente gestirà il festival in tua assenza e un Traghettatore che automatizzerà il trasporto dei beni.
Il festival

|
Il festival è dove vendi tutti i tuoi beni per ottenere i quadrifogli |
|---|

|
Il cantiere navale è il luogo in cui mantieni ed espandi il tuo traghetto. Questo costa quadrifogli |
|---|
Edifici per i beni
Esistono cinque diversi edifici per i beni. Ognuno produce diverse quantità di beni del festival. La fabbrica di cappelli è immediatamente disponibile quando inizia l'evento e gli altri quattro possono essere sbloccati spendendo quadrifogli ![]() .
.
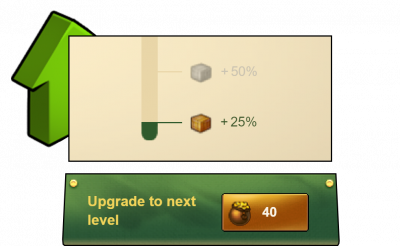
Quando un edificio sarà disponibile, sarà al livello 1. Puoi usare i quadrifogli per aumentare la produzione nei tuoi edifici. Mentre ogni singolo livello aumenterà la produzione del tuo edificio, raggiungere determinati livelli sbloccherà i moltiplicatori di produzione.
| Livelli | Moltiplicatori |
|---|---|
| 1-10 | 1 |
| 11-25 | 2 |
| 26-50 | 4 |
| 51-100 | 8 |
| 101-200 | 16 |
| 201-300 | 32 |
| Edificio | Descrizione | Costo per sbloccare |
|---|---|---|

|
Fabbrica di cappelli | Gratis |

|
Vivaio | 1.1K |

|
Fabbrica di torte | 1.2M |

|
Fabbrica di bevande | 1.5B |

|
Fabbrica di fuochi d'artificio | 111B |
I Manager
Fai clic sul cappello a cilindro per assumere un manager per le pentole d'oro. Assumere un manager automatizza la produzione di beni, il che significa che non devi più fare clic sulla tua fabbrica. E non solo, migliorerà ulteriormente la produzione della fabbrica! Assumi un direttore del festival per gestire automaticamente il festival al tuo posto e un direttore del cantiere navale per automatizzare la spedizione dei beni al festival.
| Livelli |  Manager del Festival Manager del Festival
|
 Manager del cantiere navale Manager del cantiere navale
|
 Manager della fabbrica di capelli Manager della fabbrica di capelli
|
 Manager del vivaio Manager del vivaio
|
 Manager della fabbrica di torte Manager della fabbrica di torte
|
 Manager della fabbrica di bevande Manager della fabbrica di bevande
|
 Manager della Fabbrica dei fuochi d'artificio Manager della Fabbrica dei fuochi d'artificio |
|---|---|---|---|---|---|---|---|
| Level 1 | 20 |
20 |
10 |
20 |
30 |
40 |
50 |
| Level 2 | 40 |
40 |
20 |
40 |
60 |
80 |
100 |
| Level 3 | 80 |
80 |
30 |
60 |
90 |
120 |
150 |
| Level 4 | 150 |
150 |
50 |
100 |
150 |
200 |
250 |
| Level 5 | 300 |
300 |
100 |
200 |
300 |
400 |
500 |
Next Town
Now this is all great, but what's in it for you? As you'll see, along the top of the event window, there are a list of three tasks. Completing a task will prompt you to collect the task, which will contribute progress towards your Grand Prize. Collect 25 tasks to earn the Grand Prize reward! If you're not sure what you need to do for a task, click on the arrow on the right side of the list for a full overview. Once you complete a task, click to collect it, and it will be replaced with a new task, allowing you to work towards more Grand Prize progress.
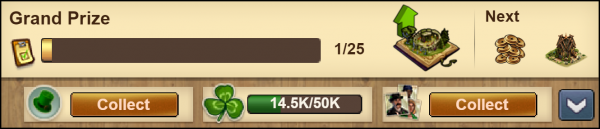
Please note that you don't necessarily need to collect all tasks in order to proceed and unlock a new town. As soon as you gather 8.4 quadrillions of Shamrock, you can click in "continue" to advance and still keep your grand prize progress (in other words, the task progress). Once you've selected your stage prizes, the town progress will be reset and this gives you the chance to start the production over, and earn yourself even more Grand Prizes.

This button will light up as soon as you have 8.4Q Shamrocks
Rewards
Eventually, however, Paddy won't have any more tasks for you to complete. Once you reach this point, click on the 'Next Stage' button in the bottom right to be presented with some end of stage reward boxes. With the Luck of the Irish, snag yourself some fantastic prizes from each box. You can open one container for free, and more containers for Pots of Gold. These costs will increase gradually the more boxes you open using Pots of Gold. Once you've collected all 6, you'll earn the collection reward at the top bar, and if you want, you can open a new set of 6 reward boxes before advancing to the next town.
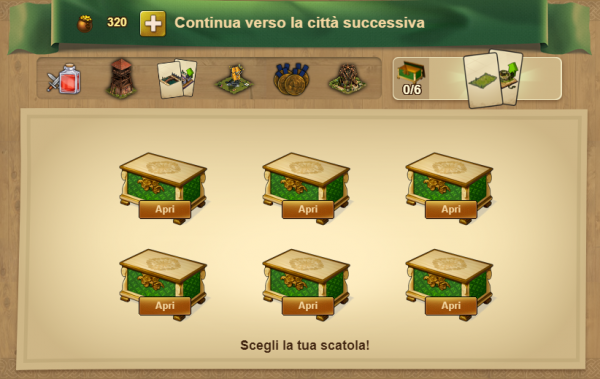
The table below details the cost of opening reward boxes from the end of stage collection screen. The costs continue to scale with each new set of 6 reward boxes.
| Reward Box | First | Second | Third |
|---|---|---|---|
| Reward Box 1 | Free | 50 |
100 |
| Reward Box 2 | 50 |
100 |
250 |
| Reward Box 3 | 100 |
250 |
500 |
| Reward Box 4 | 250 |
500 |
1000 |
| Reward Box 5 | 500 |
1000 |
2000 |
| Reward Box 6 | 1000 |
2000 |
4000 |
Druid Temple
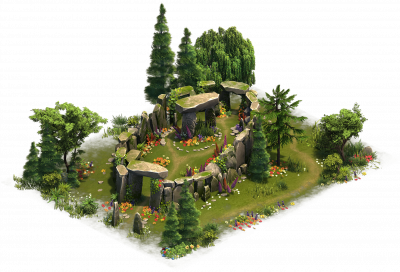
The main Grand Prize reward for the St. Patrick's Day event is the brand new Druid Temple upgradable building. This gorgeous 5x4 upgradable building has 10 levels, and once you upgrade yours to its maximum level, the Druid Temple will provide you with defense boost for attacking army, random goods and a generous additional random production, besides population and coins on top of that.
|
On level 10, this building provides up to:
|
See all levels and the building stats for the Druid Temple here
St. Patrick's Day Event Avatars
Lastly, as always, you'll get to show off your progress to your friends and neighbors, by obtaining one of the two themed portraits.